The day to day adventures of turning a 22 year old house into something updated, fun, and fresh for this family of five.
Showing posts with label kitchen. Show all posts

Wednesday, April 13, 2011

And then there were five...

...Chairs at the table.  :)


Before making room for baby, our breakfast area looked a little something like this..


Now...
Whether it is joining Daddy for a mid-morning bagel...


or having a meal with the whole family..


This little guy is WAY excited to be included at the dinner table.


Too bad he doesn't actually get to eat, yet.  :p

:)  Courtney

Friday, January 7, 2011

A new addition to the Kitchen!

So, a year and 3 months after selling our old house, AND 9 months after buying this house, we've finally moved our fridge from my inlaw's barn!  Yay!  


Funny thing is, we bought this fridge about 2 months before selling our old house, and then moved into an apartment while house hunting.  The apartment came with a fridge, and our house now was sold to us with a pretty much new fridge included, so we were in no hurry to move it.   Now here we are, with our still new to us fridge, but it is out of warranty now, after sitting in a barn for over a year, haha.  Oh, and the other day I was in Lowes and saw 3 of these suckers on the scratch-n-dent/repaired aisle.   Hope it doesn't break down on us anytime soon!  :/   yikes.

Anyway, here is our kitchen with the black fridge:


And here it is now with the new/old one!

It feels good to finally have matching appliances.  New dishwasher and semi-sort-of-new, but not really, new fridge... all within 2 weeks.  Sweet!

Oh, and can I let you in on a little secret?  Our fridge has blue lights, our microwave has green lights, our stove has teal lights, and our dishwasher has orange-- and it sort of bugs me.  LOL. 
:)  Courtney


Thursday, December 23, 2010

Look what I came home to!

A brand new, shiny dishwasher!

I went out of town with the boys yesterday morning to visit their Nana and PawPaw (my dad and stepmom) and my husband had this installed while we were gone.   He'd also done a little light hanging around the house, and I thought he'd attached the bow to the old dishwasher as a weird sort of decoration.  It took me a minute to realize that it was a new one!  LOL.

Before:

After:


Yay!  What a good man I have.

:)
Courtney


Wednesday, October 13, 2010

Kitchen Tour

Welcome to the updated tour of our kitchen.  :)


As a reminder, here is what it looked like pre-mini-remodel.
You can read about that process if you'd like by going HERE.

On with the tour!


Our kitchen is located off of our small family room, and has a small breakfast area attached.


I found a set of fabric napkins at Target that resemble a tea-towel texture.  I loved the pattern, so I bought the set of four to use as hand towels in the kitchen.

I think they're the perfect pattern to tie in the random blue and greens around the house.  I need to pick up more to make pillow covers out of before they change stock!

I keep my cookbooks in the back corner of the counter top, in space that would otherwise be unused do to accessibility.

To the right of the stove is what I call my coffee center.
I have a crystal spoon rest, my Cuisinart coffee pot that I LOVE, and my tray full of coffee goodies (filters, ground coffee, sugar) and the hot teas I use often.


On the island is the sink and the dishwasher.

On the side of the island by the sink we hung a towel rack from Target.  I happened to spot it one day in the bath section, and it matched our Kitchen faucet really well AND, it was cheap!  I love LOVE love Target bath accessories.  I believe the towel holder was around $15.

View of towel holder..

and view of semi- matching faucet...

While we went with beadboard for the back splash along the wall, we went with subways for this area since it would be exposed to more water.
I will also ONLY buy this brand of hand soap because it is the perfect shade of green.  LOL. I drive my husband a bit crazy with that quirk.


Also from Target is my kitchen mat.  It looks like it has a sisal type texture, but it is actually a foam anti-fatigue mat.  I LOVE it.  My husband loves it too.  I've been slowly changing out our rugs to sisal, sea grass or other hard on the foot rugs, and he's not a lover like I am.   This mat is the perfect balance because it gives the look I like, but is super squishy and soft.


Across from the kitchen is our laundry room (the black door), and I hung a mirror made into a chalkboard, and my Paula Deen cutting board. 

I love this board.  It has measurement tickings and pie rolling guides which gives it a vintage look.


Our breakfast area sits in a bay window space.   I have my windows open today because it is such a nice day out.  Gosh I love Fall.

Our table is a simple Better Homes and Garden set from WalMart with green striped chair cushions from Ikea.
I keep my centerpiece simple since we use this table for all of our meals.  This simple iron and white plated rack, from Target, is simple to move before setting the table.  Have you noticed I do most of my shopping at large discount box stores?  LOL.


One more full shot..    Thanks for looking!  Happy Wed!

-Courtney

Update as of Jan, 2011
We have new appliances!
Read about the dishwasher HERE.


Read about the fridge HERE.

One day when I clean my house (horribly hard with an 8 week old), I'll take updated shots.  :)

Linking to Note Songs for the Heart of the Home party.
Domestically Speaking for the Power of Paint party.
Life in Grace


Tuesday, August 31, 2010

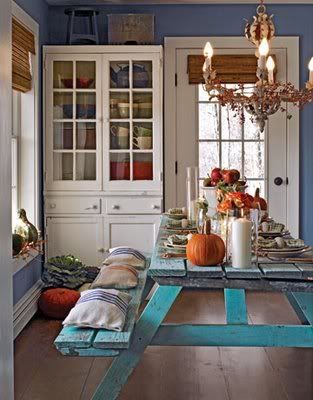
Picnic table... In a dining space??

While googling images tagged "decorator table" and "dropcloth"  I somehow stumbled upon this fabulous photo.    A little odd, since it doesn't include a decorator round, or a dropcloth.


Are you as in love with this as I am???


A PICNIC TABLE????   IN A DINING ROOM???    I am LOVING this.  I'm quite jealous that I never thought of this on my own.  Especially when searching frantically for an affordable breakfast table a few months ago.

Oh.. and with end chairs.  SO cute.


Can I completely steal this idea even though I have two tables already???  Would it be completely wacko to sell a perfectly good farmhouse dining table (it is counter height which I'm not too crazy about anymore) and pick up a picnic table for my formal dining room??   It certainly isn't that formal is it?

Oh, but it is charming.


And donchaknow (Texan girl here pulling out the midwestern accent LOL) they just had to use pumpkins to completely and fully win my heart over.   SIGH.  

What do you think?  Completely wacko, picnic tables are outdoor items only?  Or undeniably charming??

By the way, these photos are from CountryLiving.  Found HERE

Saturday, August 21, 2010

Numbered Stools

Well, I can't really say who inspired this project.  I've seen versions of this all over the Internet. 

Here is my version. 

After remodeling our kitchen, I decided that we really needed some bar stools for our bar area.  I originally wanted bar stools that would match our breakfast table. 


This is a Better Homes and Gardens set from WalMart (looks a LOT like a Pottery Barn version, so I'm always proud to tell people what I DIDN'T pay! lol), and while the matching 29 inch tall bar stools were pretty inexpensive (considering some of the pricey bar stools I've seen elsewhere) at $69 each, they were still $69 each.  I wanted at least 3, so to get those would be around $200 by the time I paid tax.

Soooo... I was in WalMart one day, strolling down the furniture aisle, drooling over the bar stools I ACTUALLY wanted, when I saw this:


It's a beauty, eh?  Okay, well.. not yet.

But, at $19, for a 29 inch stool, it's a pretty good deal.  So, I picked up three.
:)


So at this point I had three inexpensive (yay!) but ugly (boo!) bar stools.

So, I primed them, and painted them with 2 coats of leftover Valspar's Lincoln Cottage Black.

I then distressed the edges and the rungs where your feet would naturally rest.


Nice, but not quite done, right?

The next step was to print out 3 large numbers and I of course went with 1, 2, and 3.
I also printed out a 6, because my five year old (who is obsessed with printers) heard it on and insisted he get a number too.  haha.

I cut out the black part, so that only the white outline remained, like so:


Brodie and his number 6, which while working on, he critiqued me the whole time for cutting my numbers out the wrong way, LOL.


I taped the numbers down like so (I'm sure there are easier ways to do this.. vinyl being one of them, but I don't have the patience to wait when I get an idea in my head.)


I then very carefully stenciled in the numbers.  I did go over them again, with the stencil removed to get a good second coat on them and to clean up the lines.

Ta-Da!


And here they are in their place of honor...  I still need to seal them... but so far a few days worth of hiney action hasn't phased them.


Awesomeness.

Total cost - approximately $20 per stool.  Paint - already had, printed paper stencil, free!
$60.   $9 less than ONE of the stools I originally wanted, and with twice the charm.  :)

Thanks for looking and any comments you might have!